Tuesday, June 12, 2012

June 2012: Status Pictures

Some pictures of the current status ... to "give you the idea" of....
How much work is still on the sky!
Pictures follow the mainline order , starting from San Francisco down to ....
Palo Alto is actually the "end of the line".
San Francisco probably is the next step and
Santa Clara will follow next

San Francisco: still to start!
Entry to Mission Bay Staging yard
The Mission Staging
Bayshore - Visitacion Point

Bayshore - Visitacion panel
Burlingame panel
Mission Yard panel
Arriving in Burlingame
Burlingame station
The "Nolix"
Redwood Industrial area
Redwood panel
Industries in redwood
Branch to Los Altos depart the Main
Menlo Park - Los Altos Panel
Menlo Park statio (rigth)
Palo Alto bridge over San Francisquito Creek
3 panels corner

Tuesday, May 29, 2012

2 solution to move points with a servo


I’ve experiment Tam Valley Octopus servo Driver from his first version. This have software that just leave the user to select between some “angle” of movement” of the servo arm. I have to install  hand laid turnouts that need a strong force to maintain the points in pressure, and I want a solution that can be installed from the top of the layout, after the turnouts are already in place…
With this limitation in mind I select a solution that use the flexibility of the music wire to provide the necessary strength. 
See on this post what I’ve done at the time:

Then Duncan ( Tam Valley owner) add the Auto-Align software ( this will find automatically the end-point where the point rail are pushing the side rails)…. I’ve try also this cards, but find the trick some difficult, at least with my turnouts in N scale.
Now a new software is loaded in the last Octopus III version, where a “manual adjustment” is allowed (along with a more comfortable handy keypad! ) and this …. It’s exactly what I’m waiting!
The “auto” followed by a “manual” programming have solved all problems and ( also because a friend have critiqued, and I agree, the visual aspect of the previous mechanical solution ) I was ready to find a more “traditional” way to install the servo.
A visit to the bricolage shop and I take home the proper tool: one aluminum bar of the same dimensions of the servo!

Here you can see a video with the two solutions: https://vimeo.com/43026665

Materials:
-          Aluminum “U” bar cm1,5 x 1 cm (more or less 4$ for a meter ) : |___|
(I figured it was better to have metal at the pivot point )
-          SG90 Servo with moving arm accessory
( I’ve buy a quantity from : http://stores.ebay.com/top-racing2007 ( use the search field and type SG 90 for some bulk pack at good price: $2,5-3  for >12 pcs.)
 Tam Valley also sell for SRV002   $4.95 USD)
http://www.tamvalleydepot.com/products/servosaccessories.html
-          Music Wire .032" (available from Tam Valley, but also from LSH or WallMart)
-          Strong foam double face tape
-          Tam Valley “Octopus III” 8xservo driver card: OCT030   $32.00 USD
-          Tam Valley Remote Aligner for Octopus III: OCT031   $12.00 USD
http://www.tamvalleydepot.com/products/octopusservodriver.html
Note that Tam Valley have discount prices for quantity.
Options:
Fascia Controller for use with Quad/Octopus II/Octopus III:  FCB010   $2.50 USD
Remote DPDT Relay with Y Cable: DY5001   $7.00 USD


(above pictures from the Tam Valley web site)


The second solution: “a la Tortoise”:
Mounting
1)      Cut a piece of 4 cm. from the Aluminum “U” bar

2) Place the servo as show inside the bar without the tape
 3) Place the moving servo arm without the screw and using the music wire put a point on the aluminum bar leaving the music wire in vertical. “Dremel”  a 1mm-1,2mm hole

4) If you’ve already installed the turnout on layout, or the turnout is in a place too difficult to work from bottom , then position the turnout with point opposite to throw bar end where you want the wire and sign the place for the wire hole just in line with the throw bar end. Drill a 3-4 mm hole from top of the plywood.
5) Now using the double tape fit the servo inside the metal bar
6) Bend the music wire to the servo arm as show.
7) Connect to Octopus and position the Center Jumper on CENTER (servo will move the arm in the middle position) . Screw the servo arm to be on line with the 1mm hole.

8) Fit a piece of tape on top of the metal support and From “downunder” ( but without touch the plywood) insert the servo more or less in position. Try to emulate the arm movement to find the best servo position. Push the servo in place.
9) With the arm always in CENTER move also turnouts point to center. As I’ve a copper plate throw bar, I’ve used one thread of electric wire turned on the music wire to make the connection to turnout throw bar and solder to it (use always some flux)
 10) Program the Octopus III and enjoy !


Wednesday, April 18, 2012

Start to plan for Operations


Here I want describe one of the possible path to organize Operations on your layout.
This is the way I found simple for me, but I understand it can not the same for everybody. I’m not a Railroad “Pro”, more a modeler that like the Operations and this I’m sure is reflected on my approach.
That said, as a modeler… I start from the track plan!
1- Start to Plan your traffic:
Well, not exactly, as my plan was designed with the fundamental railroad rule in mind: rail traffic is generated from customers and rail service must have a revenue to have a reason to be ( as any business adventure, I well know!)
So, after reading a lot about SP Coast Division ( type of traffic, type of merchandize delivered, history of some key-industries, history of some key-town along the route, timeline for main freights types to identify what-was-when, etc….) I’ve identified some subjects I like to model in the selected era and selected locale:
-   cement traffic from manufacturer to distributor
-   perishable freight traffic with typical car management (cleaning, icing, loading, pre-cooling, unloading )
-   some wood-chain industries ( not the lumber sawmills on the mountains that are simulated from staging but furniture makers, building materials resellers , crates manufacturers …)
-    food treatment chain ( canning , frosting,  packing,  stocking, transfer to trucks for door delivery…)
-    Chemical raw materials supply for food treatments and gasoline for automobiles, oil-derived products for  industries and… to run trains motive power
-    Express mail traffic and LCL ( Less –than-Carload package shipping: what in modern time is UPS-DHL and USPS delivery )
Setting these  “Given” in a list was a good start, and I’ve used this “guideline” to find good names for all industries along my track plan  and “on the outside world ( the two staging yards )” and design all service tracks ( spurs or sidings) that will do the jobs.
The result was something like this document, that shows all main buildings along the path from San Francisco to San Jose: my modeled section of the Coast Division.
Buildings list

 2- Shipper / Consignee and Lading list:
Well, after this, and sourcing from the Customer list referred above, a second document take shape.
This will list all customers ( using Excel or any different spreadsheet software give you the “sort” facility: sort by town, by lading, etc), setting also quantity of cars they weekly need.
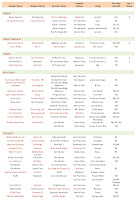
Shipper/ Consignee- Lading & Cars count
If you’re interested to download this document and use it as form to fill with your data, I’ve put it in the Google document service as “public” ( no on line editing ) . here the direct link:
Select “File” menu and then “Download as..” and select the format you like ( Excel or Open Office are obviously editable formats).
A good starting source for Industries names, his location and lading type, can be the OpSIG (Operations SIG of NMRA) database, that is available at their website, http://www.opsig.org, under “Online Resources,” and then “Industry Database.”
This sheet will be the basic document to plan your traffic, unrelated to which  method you may select to implement ( Car-Cards & Waybills. Switchlist, Timetable & TrainOrders, Warrants…. or any of the “electronic” alternative , JMRI  included) 

3-      Timetable
Before speak about this we’ve to prepare another “basic” : a Timetable of the “scheduled” trains, passengers trains included if you plan to have it. To do this job, I take as a good start a real Employee Timetable of a relevant year I want model. For an example of some “vintage” SP Timetables, you can source on my page here: http://enzofortuna.altervista.org/SP_doc.htm  
Here is a sample ( in progress as you see) of my ETT prepared for my layout:


Again this is available to download at Google Docs using the same procedure as above:
You see that I’ve listed regular and “named” trains, both passengers and freights. In addition to these some 3rd Class “Extras” are generated (randomly or when the OP session need some “excitement”).
Given the number of operators my layout will have “normally” , I image to split the daily time in 4 consecutive OP sessions. Anyway we will define this when the time of a first “Round Robin” become a reality!
An important "visual" addition using Excel or similar software is the ability to generate a "Traffic diagram". This helps a lot to check train meetings and timings on the line.
Here is a good sample and explanation: http://mdodd.com/virginian/string_diag.html


4-  “on hand” documents for your crew
All these activities give you an organized basis to step forward with next action: prepare documents to have “your Railroad running” in a prototyped simulation.
The traditional choices, as said, are:
-     Car Card & Waybills
an attractive prototypal approach to Waybills can be found on Tony Thompson’s blog: http://modelingthesp.blogspot.com/2011/11/waybills-15-managing-bills.html
-     Switchlists
For example of this approach see the Robert Bowlidge site : http://vasonabranch.blogspot.com/2012/04/switchlist-move-cars-by-shuffling.html
-     Track Warrant
see for explanation the Carsten S.Lundsten site:
http://www.lundsten.dk/us_signaling/twc/index.html#TheTWForm

Any of these methods have sustainer or detractors, but I want to describe in a next post an alternative I want to follow ( at least as my first option ) given my inexperience in car traffic planning: I want try to use the Operation section of JMRI , a freeware software that maybe some of you know ( and use?) to program you DCC decoders or display CTC panels.
So, wait ‘till I find some time to drop another update here!

Friday, April 13, 2012

Locate and name correctly: partial plan review


Well friends, one of my worry was always the not correct position of the Menlo Park and Redwood Junction along the line and also the toy like shape of the industrial area at Redwood. So, taking advantage of my now steady lacks of time to advance in track laying …. ( you remember the declared strike of the road gang on my last post here ) , I fire back the layout design software and ….. here are the results:
-          Shift Redwood and Menlo to his correct position along the line !
-          A better ( at least so it seems to me ) spurs layouts for some industries that will provide some challenge to switch and a more “railroady” feeling of the entire scene in Redwood Jct.
-          Browsing some old mails from friends discussing candidates for industries at each location ( and a big “thanks” to Robert Bowdidge suggestions about the area ) I start again more Internet research for good names.
-          I ended to define all industries located in my industrial “park” and find several pictures of each.
-          Also I’ve relocated the diverging point of the Los Altos branch adding some more length to train travel.
-          As a freelance choice, and ‘cause I always want to have a Winery in some place, I select the Rossetti Bros. ( really on the Santa Cruz Hills ) and place it on the branch.
-          As aside advantage Menlo Depot is now in a better location near the layout edge, to become a key-point to identify the scene and my Coast Line portion.
-          So, now, avoiding the previous switchback, unrealistic curves, I have a smooth ladder layout for 4 Railroad customer, and a correct prototypical sequence of location! Not bad, I think.
What all this means is this next weekend have to devoted to scrap away the already in position cork ( from the “old” Menlo” to Palo Alto ) and lay down the new roadbed!
Here you see the design “before the cure” and “after the medicine”:
Before ....
... and "Now"


Thursday, March 29, 2012

Spare updates

A little update for the few visitor here "waiting" some news from the Valley.
As already said I can't find so much time as I want to progress of a significant step, so again I force me to find half an hour someday when I can .... and put my hand on "light projects".
Slow progress is still progress.

Decoders
I've install some decoders in my steam power ( all Soundtraxx Tsunami 750 , but in one case I was not able to fit more than a Digitraxx non-sound in the Model Power Mogul, and I must say was very funny to see the loco moving without any noise! )
Aside this I've in order two Locksound Select micro : have hear good and bad about this decoder but the price ( more or less 80 bucks) and dimensions ( a bit less than the Tsunami ) seems interesting: we see when I've it on hand.
Also have installed a pair of Brass Key Import F7's ( a Lenz silver in A unit, and a Tsunami with the proper 567 engine in the B ) so have also the possibility to run a Freight with these sweet Blackwidows! Here a picture of the couple: http://enzofortuna.altervista.org/SP_Diesel_Fs.htm

Layout Plan
Got a little review of the plan in two parts:
San Francisco: elimination of two Double Slip without lose the feeling of the original design. Now I've just 4 Double slip to make ( I've already done two!) . Repositioned two turnouts on the Turntable entry to have a better flow for trains composition during Op sessions. Also definitely abandoned the idea of a working Why at Potrero. The space available need a too tight curve to fit and too much work to handlay the needed crossing and turnouts to mainline. So I've dropped all freights departure from Mission Bay staging and it will service to food the Kings Road yard and warehouses, from where freight trains will start his trip to south. Just a short piece of track end near the tower and I think to leave some ties and rail on the ground to resemble a renew of track layout. Some "little" workers will be a good subject for a different scene when time will arrive.
Menlo Park - Redwood: Redesign of the industrial spurs with one switchback ( despite I don't love this configuration) to fit one industry more.
Here the two Mods:

Tracks and Servo installation
The mainline have suffer a "steady stop", unfortunately in Menlo Park! Southern Pacific is pushing the gang to restart the work and seems some agreement is on signature.... SP officer refer maybe after Eastern the gang leave Menlo to south.... we will see.
I've anyway make some progress in the servo installation of turnouts in Menlo Park and I will upload here some pictures of the progress. soon.
Later, friends, for now


Tuesday, January 31, 2012

Tracks reach Burlingame... again?

 Well, in fact tracks are already layed here, and trains have already take a trip along the (future) eucalyptus row…. But the train crew claims for an unknow reason …. to have some way to be able to switch the mainline turnouts ! So Espee have to send a “specialist” there to solve this stupid problem.
Well, he uses a lot of wire, a lot of patience, and this is the result: a new panel ( “unfortunately for the purist … incorporating the “underground” section to Mission Yard: a “mystic” yard that a “legend” position in a different place  … )
-
Here we can see a part of this “under world” where ( to mantain alive the myth… ) a strange but very effective illumination provided by … Christmass tree LEDs…. give a fogless vision to all Engineers searching the correct parking track!
The entry of the "Under World" at Mission Bay
Curved turnouts


See you at next Flag-stop!

“Iron spike” ceremony at Bayshore-Visitacion

Here again: news from the “track gang”…
Bayshore tunnel and Visitacion Ice facility received at the end all his tracks and the “gang” installed also all turnouts, servos and wired a “decent” switch panel.
North end : tunnel exit
South end
At this point the main goal was to have the line working and trains rolling, and I’ve take a “short path” to implement the panel from the planned one:
Panel was made using 5 mm Forex, then I drill all holes for the Tam Valley Fascia controllers, installed all board  and wires and lastly I print the panel on 120 grams paper ( using 3rdPlanit) , drill holes with a paper hollow punch and …. That’s all, folks!
To drive the turnouts servo ( see a previous post on this blog ) I use Tam Valley Octopus card.
The last Duncan’s firmware was very good, and the automatic search of the end-point is working very well, given the Fasttracks turnouts need a hard push to points rails.
My only disappointment was the practical useless of this feature when I’ve try to command two turnouts with the same output ( as in crossovers ).
But I “guess” is my fault given my “imperfect” handmade turnouts have different tolerances.
Well, I use one-to-one commands: this just need some additional attention from the crew, but maybe add some more prototypical fashion to the game: switch each turnout one at time and pay attention to the next in the path.
The gang was send to Burlingame for the next upgrade of the line!
Later.....

The born of a twins couple


Hello friends,
ultimately I’ve not post any progress …. as I’ve not see really relevant progresses!
BUT …. As already stated, ultimately I can’t have a complete day to spend on the hobby, so I’ve adopted a little steps policy, and here is an update, at the end!
A “twins” couple: handmade double crossover
I’ve plan to use a couple of these combination along the right of way : one in SF before the curve at Mission and the second on the entry to Newhall ( Santa Clara ) yard.
I must say “nothing complicated” (as the double slip, for instance) but not trivial for sure, despite the use of FastTracks jig. The trick adopted to make two sections and then combine them .... well, maybe because it's the first, but made me sweat a bit! FastTracks instructions are “very HO pointed” .
Obviously the photos are on a just completed item, I still need to paint the sleepers and rails, but I hope to give you the idea anyway.
Well, next upgrade have take place at Bayshore-Visitacion .... Follow me :)

Model Railroad Hobbyist magazine - Totally electronic, totally interactive, totally free - Premier issue: January 2009